
Friday, December 14, 2012
Christmas Ornaments
We colored our ornament with our crayons first then we added glitter to make our ornament sparkle! They had a lot of fun shaking the glitter on it.
Thursday, December 13, 2012
Penguin Feet
We made penguins out of our feet! We painted the inside of their foot white and then around the white was the black. The after it dried I added the arms and face, they turned out pretty cute :)

Wednesday, December 12, 2012
Christmas books
All of the fun Christmas crafts we did and put them in a folder. We made a Christmas tree from our foot on the front and decorated it with a star and some presents. Then we added a glittery Merry Christmas to the top of the folder! It turned out as a great Christmas book cover :)

Tuesday, December 11, 2012
Angels
We made our angels out of our feet and our hand prints! The feet is the body and the hands on the wings and we painted out cost for the head and added a halo to it. The verse that I added is Luke 2:9-14 "And, lo, the angel of the Lord came upon them, and they were sore afraid. And the angel said into them, Fear not: for, behold, I bring you good tidings of great joy, which shall be to all people. For unto you is born this day in the city of David a Saviour, which is Christ the Lord. And this shall be a sign into you; Ye shall find he babe wrapped in swaddling clothes, lying in a manger. And suddenly there was with the angel a multitude of the heavenly host praising God, and saying, Glory to God in the highest, and on earth peace, good will toward men."

Monday, December 10, 2012
Candy hands
We made Christmas candy using our handprints! We painted them red to make the twisty part in the candy. The poem in the middle of the candy is "I think you're sweet as candy. Your love always makes me smile. Please keep these hands to remind you, of when I was a sweet little child."

Sunday, December 9, 2012
Mitten hearts
We made our handprints inside the mitten cutouts and glued them onto a heart. The saying reads "Cold Hands, Warm Hearts". Then we added some glitter snowflakes on it as well.

Saturday, December 8, 2012
Snowman ornament
As a present to the parents we made handprint snowmen ornaments! Painted their hands white and after they dried I went back and drew on the snowmen faces and hats. They turned out really cute and will be a great present for them. :)

Thursday, December 6, 2012
3 Wisemen
We made the 3 Wisemen with our handprints as the camels and our fingerprints as the Wisemen. Then added a star and I think it turned out really good. Definitely a good reminder of the real meaning of Christmas!

Wednesday, December 5, 2012
Christmas crafts
We made Christmas lights using our fingerprints! They turned out really cute. :) Then we made Christmas trees out of our handprints and added some glitter and a yellow star on top!


Tuesday, December 4, 2012
The letter I
We made ice cream handprints to go with our talking of the letter I. We talked about Itchy Inchworm and all things that start with I. They loved making them!

Monday, December 3, 2012
Snowmen!
We made snowmen out of our feet today! They were excited to see what their white footprint was going to make. They turned out super cute and everything :)

Sunday, December 2, 2012
Mistletoes
We made mistletoes out of our feet! We painted them green and then added the berries with our fingers. Then added some lights with our fingerprints around their feet.

Friday, November 30, 2012
Farm week
This week we are talking about the farm and all the animals that live on the farm so we did several different animal handprints :) In addition to our handprints we made a paper plate pig that they got to paint pink. They made a mess painting and may of gotten more paint on themselves but they had a blast doing it! :)


Candycanes
To start off the Christmas season we made candycanes out of our fingerprints! We alternated between red and white and added some glitter and a green bow to finish it off.

Thursday, November 29, 2012
Thanksgiving tiles
As a Thanksgiving present for the parents we made a turkey handprint and put it on a tile as a keepsake. They turned out super cute and they loved putting their handprint on a different texture. After their handprint dried I added the year and then their name beside the year. Next I glued on some ribbon so they could hang it up (not shown). The parents seemed to love them as well!

Wednesday, November 14, 2012
Turkey Hats
We made turkey hats for our Thanksgiving party on Friday. The feathers are made out of their handprints which they got to choose the colors for. They turned out really good! 
Tuesday, November 13, 2012
G and H Handprints
These are our animal handprints for the letter G and H. A giraffe and a hippo :) they turned out really cute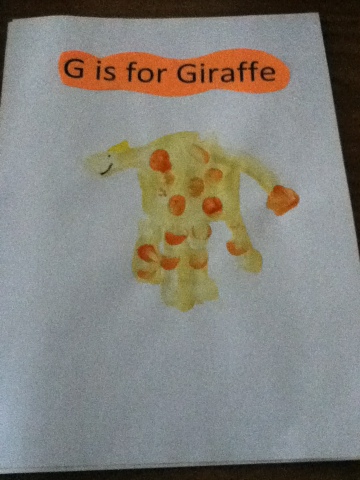

Friday, November 9, 2012
Turkey paperbags
First of all I traced their hands on different pieces of construction paper and then cut them out. Next we glued their handprints onto the paperbag. Then we added googly eyes and a beak to finish off our turkey! 
Thursday, November 8, 2012
Turkey Hands
We made turkeys today in celebration of Thanksgiving this month! We painted our hands different colors as the feathers of the turkey and then added some googly eyes and the rest of his face. They loved painting their hands the different colors.
Wednesday, November 7, 2012
Apples and Hands
We made apples with our handprint as the stem. It is a white apple cutout and we glued on pieces of red construction paper to make it red and then added our handprint for the stem. Then added some glitter for fun! They seemed to enjoy both steps :)
Thursday, November 1, 2012
Candycorn Hands
We made candy corns out of our hands today. They turned out really cute and they loved using the different colors on their hands. 
Wednesday, October 31, 2012
Fall into Fall
This is our fall into fall craft. It is a cutout of a fall leaf with their handprints on them. Then just glued them onto a piece of construction paper. It turned out pretty cute :) 
Monday, October 29, 2012
Fall pumpkins
This week our theme is fall so we decided to make some pumpkins! We made them out of white paper bags and painted the bottom part orange and the top brown for the stem. The green around the middle is a pipe cleaner and just curled the ends some. They turned out really cute though :)
Sunday, October 28, 2012
Firefighter Handprint
We talked about the letter F this week and talked about firefighters so we made a handprint of firefighters! They turned out really cute and they loved seeing it when it was done :)
Tuesday, October 23, 2012
Paper bag fish!
We made fish paper bags today! Filled up about half the paper bag with paper towels but you could use anything then I used a rubber band to tie it off. Next I put some glue in squiggly lines and let them put the glitter on themselves. This was the first time we used glitter but they seemed to greatly enjoy it! Next we added a big eye to the fish and a pipe cleaner for the fish's smile. They got to pick which color pipe cleaner they wanted too. It turned out to be a very cute craft. :)
Monday, October 22, 2012
Alphabet Hands!
We are doing a hand print for each letter of the Alphabet: This is what we are up to so far, I think they have turned out pretty cute :)
 |
| A is for Alligator |
 |
| B is for Bee |
 |
| C is for Cheetah |
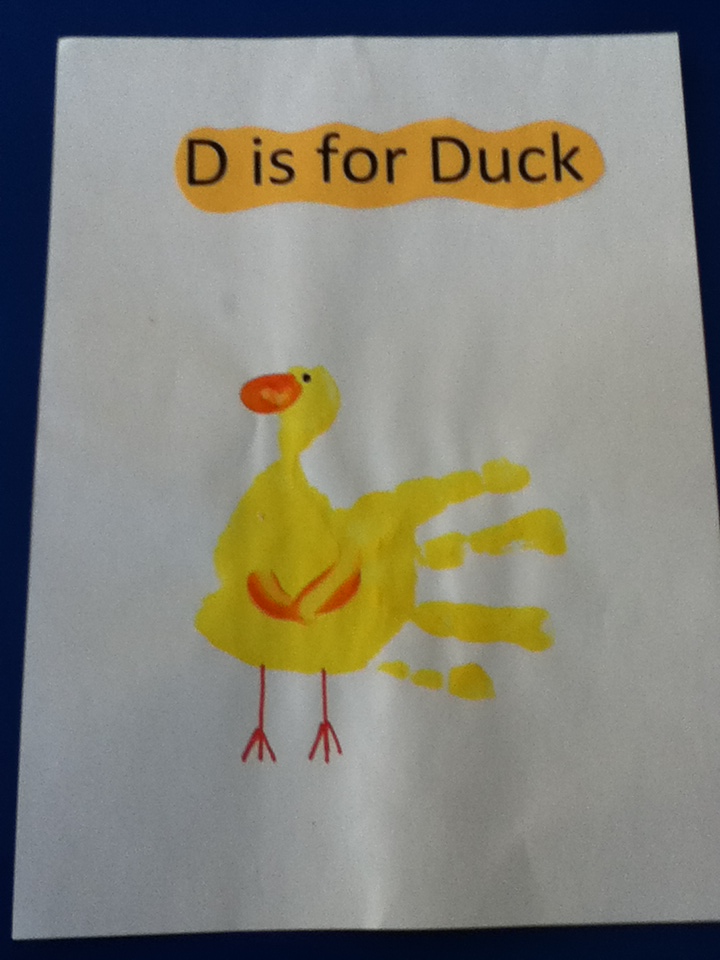 |
| D is for Duck |
 |
| E is for Elephant |
 |
| F is for Flamingo |
Wednesday, August 15, 2012
My Preschool Room!
 |
| To the left are our colors, the middle has the numbers, and then on the bulletin board it says Great Work Grows Here and this is where I will be hanging the children's artwork! |
 |
| This is over where my hooks for the children's belonging are. They have owl name tags which are really cute! Then the Happy Birthday chart and schedule are above them. Over to the left is our Bible/Story Time center with the cool green put together pieces. |
 |
| This is my whiteboard as soon as you come into the room. This is where you will find information and what we will be learning about during the school year. I added the fun border around it to brighten it up some! |
 |
| This is my owl job chart. Each child has a job for that day which includes: Line leader, door holder, caboose, straw helper, juice helper, holding the America flag, the Christian flag, and Bible. Kids love to be able to help out and it's such a cute way of displaying it! |
 |
| This is how we are going to be lining up! We have bug ropes to help our children get from place to place safely. So I used feet to help them line up on the floor and then to use to the bug rope. I think they turned out great! |
Tuesday, July 31, 2012
The Letter U
 |
| For the letter U, I asked them what they painted to do with it. They love to do the dot art and ask for it quite frequently so I let them pick the color and go to town on it! |
 |
| Then we made Umbrella puppets to also talk about the letter U. I let them water color it. They love to take their time and use all the colors when water coloring :) |
Saturday, July 28, 2012
The Letter T
 |
| For the letter T, we colored a tiger strip. They wanted to color it just like a tiger and told me what a tiger looked like before I even had a chance to talk to them about it. They loved coloring the stripes and everything. |
 |
| Then we colored a turtle and they got to draw something on the back of the turtle and then tell me what the turtle was carrying. They did a great job and I was very impressed. This one is a goose that has a beak and one eye and if you look near the back of the shell you can actually see a little goose head. They did great! |
Thursday, July 26, 2012
The Letter R
 |
| For the letter R, We glued pieces of red, orange, and yellow tissue paper on our R. They loved to do this, because we hadn't used tissue paper like this before. They listened great and had a blast doing it. |
 |
| We also colored a rainbow with the actual colors of the rainbow using ROY G BIV. They actually knew where some of the colors went without me telling them. Then we glued cotton balls on for the clouds! |
 |
| We made rocket ships to continue talking about the letter R. They got to pick from the colors red, orange and yellow and we reviewed our shapes as we went. Using a square for the bottom, a rectangle for the middle and a triangle for the top. Then I added some "smoke" with white chalk and let them use some star stickers to put in the sky. |
Monday, July 23, 2012
The Letter Q
 |
| For the letter Q, we read a story and then I asked them what they wanted to do with the Q. They all decided they wanted to dot art the Q. Dot art can be loud but they love to do it and stayed in the lines really good! |
 |
| Then, we colored our queen and let them put either glitter or jewels on the queen's crown. They loved to add a little something extra to the crown. |
Friday, July 20, 2012
The Letter P
 |
| For the letter P, we made a Pig! We sponge painted the big P and they the smaller big pieces they cute out of construction paper and we glued them all on the big P. They turned out really cute :) |
 |
| We made a Penguin! I personally love penguins so this was fun for me as well! We colored the wings and the head black and the feet orange and they could color the bowtie whatever colors they wanted. Then we glues on the pieces on the paper plate making a Penguin paper plate. |
 |
| We also sponge painted a Pumpkin with orange paint. They love to paint and to use the sponges to make things with. They had fun making all the things that start with P! |
Subscribe to:
Comments (Atom)