Sunday, June 17, 2012

The Letter E

For the letter E, we sponge painted it grey. They loved seeing how black and white mixed together made grey. After they sponge painted it, we waited for it to dry and then glued a huge eyeball on the top and added a smiley face to make an elephant out of our E. They loved how huge the eyeball was too and kept referring to it as that! :)

Saturday, June 16, 2012

The Letter D

For the letter D, I let them dot art their big D. They love to paint and use the dot art and I explained that dot art actually began with the letter D. It makes some noise letting them do this b/c they love to do it all over and fast, but they do it well and listen. I let them choose a color that we had to do it and most of them stayed in the lines of the D.

For our craft, we made paper bag ducks! We used crayons to color the 2 parts of the duck, the head and the mouth. They asked to cut them out themselves, so I let them and they did a great job! Then we glued it down and added some yellow feathers for the feathers of a duck. After they were dried, they got to play with them some and had a blast! :)

Friday, June 15, 2012

The Letter C

To review the letter C, we made a caterpillar out of our big C! First of all we colored it because color starts with the letter c, then we clue different colored/sized pompoms around the C to make the caterpillar shape. Next, we added some googly eyes and for the antenna we used pipe cleaners. They got to choose which color they wanted everything and enjoyed seeing their C turn into a Caterpillar! :)

For our craft associated with the letter C, we made plate plate clowns! They got to color the pieces of the clown with their markers and then they cut them out themselves. they are getting much better at cutting out their own work and they love using the scissors! (Just have to keep a good eye on them :) ). Then we glued it all on a paper plate and added some eyes and a smile. And there you have our clown!

Monday, June 11, 2012

Summer

Summer Camp started up at the Preschool last week! I have my own class of 3 year olds and have 9 kids! :) I am very excited and we are having a blast so far. We are doing review papers to review all our alphabet, shapes, numbers, and colors. We do this through various crafts, worksheets, and fun activities. I will be posting some of the things we do with each letter as we review and any other fun crafts we end up doing in the course of the summer! I forgot to take pictures of what we did for A, so I'll just write it down. We used dot art to cover our big A and then we sponge painted an Apple and talked about how it started with the letter A and other things they came up with that started with the letter A. Here is some of the B stuff we did today:

This is our big letter B. We talked about it and read a story about Bubble Bear. They got to watercolor their B and absolutely loved it!
This is our Butterfly that goes with our letter B. We used out hand print 4 times to make it's wings and made sure our thumb prints were matched up with the antennas. They got to choose what color they wanted their butterfly as well, so they were all different colors.  After their hand prints, they got to glue their wiggly eyes on their butterfly. Then I added a smiley face to make them happier! They loved doing the craft.


Thursday, May 31, 2012

End of the School Year

As we round up the end of a school year, I give my kids a present at the end of the year just as a little something special. :) This year I did similar to last year sand buckets! I had a lot of fun getting the needed things and putting them all together.
I got bubbles, sand molds, chalk, and playdoh to add into their buckets!
Some capri suns, teddy grahams, and cheez-its as well!

This is what the bucket looked like from the inside.The shovel came with the bucket.

All the buckets finally put together and ready to go! I'm sure they will love them!


Thursday, May 10, 2012

Mother's Day!

We made flower pots for Mother's Day out of our hand prints and fingers. We painted our hands green for the pain part of the flower and then used out thumb and fingers to do the flowers. We did yellow thumb prints for the middle of the flower and then let them choose which color flower they wanted next. The poem that is written on the flower pot is "I've made some May flowers/With my finger and thumb/So you'll have those/Memories/For all the years/to come!"
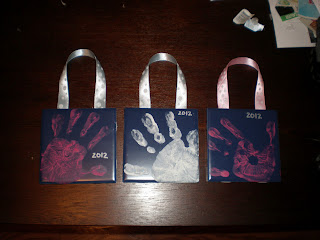
We started out of big mother's day project by painting our hands on tiles from Lowe's. The blue tiles only got .45 cents each and I let them choose whether they wanted white hands or a pink hand. They listened very well by not moving their hand on the slippery surface. I let these dry for several days (over the weekend) to make sure they were completely dry.

Then I added the year wherever it would fit the best at. Then I sprayed two coats of finishing spray over it, to just seal everything in. Then I attached the ribbon with hot glue. The pink ribbon was for the girls and the blue ribbon was for the boys.

This is what the back looks like. The ribbon is attached and then the card with the poem for Mother's Day and then signed their name. I made the poems and then cut them out using fun scissors and then some darker blue construction paper and then lighter blue for a border.


This what the poem says! I think it's really cute and a good memory for the mother's when the child does get older.

Then after they were all done. I wrapped them all in different color tissue paper and then wrote "Happy Mother's Day" on them and on the back is "Love, then the child's name". I think overall it turned out to be a very cute project!
These are part on the folders we made to be able to put all the paper and such they made for Mother's Day inside. We used their handprints on the front. And to be a little different I let them choose 2 colors per hand and they loved it!
On the back of the folder we placed our feet prints in multiple colors as well. The hand prints on the front to indicate the beginning of the book and then the feet prints on the back to finish out the special Mother's Day booklet.


Wednesday, May 9, 2012

Ostrich

We made Ostriches out of our hand print. They were excited to see what an ostrich looked like. We used brown paint for the pain part of the body and then peach paint on the thumb for his head. Drew some long legs and added and eye and beak. They love making things with their hands and feet and always ask what we are doing next! :)